So 3-0 and winner of this event. Chris ended up getting third by a point (remember my Supreme Sorceress blowing up and giving him two points?). I had a good time and would go back for another event if available and not already around a bunch of other events I’ll be doing. I imagine I’ll go more in the fall/winter when, in the post QCR part of the year events tend to be less frequent.
I wonder if for another jaunt to this club if it would be possible to design a list that even if it lost 3 times would give up so few points that it could end up winning on the secondary objectives. As in it doesn’t have enough secondary points to give up adding to them taking primary that it can win on secondary alone. Would be an interesting thought experiment, but I’m not sure I’d actually try it.
The shop was also offering 25 percent off for anything that they didn’t have on their shelves. I took this opportunity, and my newel won store credit to order the last piece of terrain for my upcoming rebasing along with some models for a few conversions I’ve been pondering for the Ogre aspect of my skaven.
I do intend to have a hobby aspect to this blog, but as I haven’t actually done any significant hobby yet it hasn’t made it on. My current projects include a Grey Knights army and some updates for the Ogres I just mentioned. The Grey Knights haven’t seen any work in a while, but I will post pictures once I get through the current step. But in the short term they are being shelved as my schedule precludes me from participating in any of the local 40k events for the next four months or so. Upcoming in the next few weeks will be that (Rat)Ogre update.
Also, this event with its three wins brings my 2013 Dark Elf record to 11w/5l/0d
Showing posts with label olde world. Show all posts
Showing posts with label olde world. Show all posts
Wednesday, April 3, 2013

Olde World Gaming – Round 3 – Chris Perriraz – Lizardman
Round 3 and back on my first table. Out of order, here is the table description:
There were three buildings on the table, one each in opposite corners of one level and a big three level on more center. There was also a thick wood hedge (hard cover, -2), an impassible grave and a small forest. The top left building granted a 6+ regen to any ‘good army’. The big building provided any wizard within 3” access to his entire spell lore. The grave caused a +1 to point on any model within 6” and the building in the bottom right gave an ‘evil army’ -1 leadership within 6”. Go check out the round 1 post for the pictures of the terrain and my initial round 1 thoughts. Going into this game I had no concerns about the terrain. I also got the “left” side in the pictures from round 1, though for this report I will be orienting based on my board edge.
I wasn’t surprised when I saw that I was being against my friend and club mate Chris for the last round. He is a solid player, and while I thought the abomination in his second round might have given him trouble, I knew he had the skill to deal with it (especially against a less experienced player). Chris’ list was:
Slann, Lore of Shadow, Plaque of Tepok, Blood Statuette of Spite, BSB, Standard of Discipline, Focused Rumination
Scar Vet, Cold One, Burning Blade of Chotec, Dragonbane Gem
20 Temple Guard, Full command, banner of eternal flame
30 warriors, full command
10 Skink Skirmishers
10 Skink Skirmishers
10 Skink Skirmishers
10 Skink Skirmishers
Chris and I had been talking about Blood Statuette of Spite, which is a one use bound 5 spell that is cast on a character. It forced a toughness test that if failed causes a wound with no armor save. It then requires additional saves until one is made or the character is killed. Chris had been trying to think of something to do that wasn’t death but still allowed for a critical character snipe. We decided that if he wanted to try it, then the proper lore would be Shadow as it allowed for the lowering of toughness through Withering. It also provided him the benefit already inherent within Shadow magic, which I understand he used quite effectively in his other two games.
Against me Chris took Penumbral Pendulum, Mind Razor, Miasma, Withering, Steed of Shadows. It seems he had dropped Pit of Shades for Miasma, thinking that high initiative shades wouldn’t be at risk. I pointed out that Hydras only had an initiative of 2. I thinking dropping Steed would have been a better play.
The Mission: Battlineline
Primary Objective: Destroy the enemy’s army.
This mission had a convoluted way of figuring out the victory. First, no points were given for killing the general or capturing banners, just for the cost of the unit/model. It requires dividing the losers points by the winners points. I guess this is a way of scaling the 100 points required to win by the size of the game, but it just seems like extra work.
90 to 100 percent – Draw and both players get 1 point
75 to under 90 percent – Winner earns 2 points
50 to under 75 percent – Winner earns 3 points
Below 50 percent – winner earns 5 points.
Secondary objectives:
2 Points for slaying general
1 point per standard
1 point for table quarters that can be held or contested by 1 model.
Maximum points that can be earned are 15.
Looking at Chris’ list I see that I could earn a maximum of 15 (5 points for max win, 2 points for general, 4 points for banners, 4 points for quarters) but could give up 16 (5 points for max win, 2 points for general, 5 points for banners, 4 points for quarters). This makes the closest spread and also the only one where I could possibly get a maximum of 15 points.
Looking at Chris’ list I commented on the large amount of fire, both the Temple Guard and the Hero (who went with the warriors). He responded by saying he knew I was taking two hydras. This answered easily how he was able to deal with Abomination as well. I wasn’t worried though, while it did mean I would have to be more conservative with the hydras, I was confident I could whittle the units down enough that even if they could put a few wounds on the hydra, I would be able to win the combats. But first I knew I had to deal with the 40 skinks.
 We rolled for sides, and I got to choose the one with the building that allowed my caster all spells. Chris deployed his army center-right, skinks, temple guard, skinks, temple guard, skinks, skinks. While deploying he put down the skinks first, long ways as shown in the picture (along with Chris’ commentary on my blog). I asked him why he was doing it and he said he liked to put a skink break between each unit, so that it can use its increased movement to be in front of the blocks without requiring the blocks to deploy farther back. All I saw was that if I was smart about my movement it would mean he wouldn’t be able to shoot me first turn, or if he did it would be with only 4 skinks and would leave the unit vulnerable (win/win for me).

 I deployed a dark rider unit on the left flank, my general near the building, two dark rider units on the right with the hydras and bsb. I put the shades on the left flank. I vanguarded strong on the left, and just enough on the right to make that choice for Chris (4 shots or no shots, but more for stand and shoot).
We rolled, and I got first turn. I immediately swung the hydras and bsb hard right in the hopes of luring his blocks that way so my general could stay near the building and get access to my missing spells. Chris joked that I needed to suck my wizard into the warp on the first spell, so for my 6/5 magic phase I obliged him by rolling a miscast on my first spell, soul blight on the left flank skinks. Instead of sucking my caster into the warp though, I instead dropped him to level 1 and leaving him with only power of darkness and caress for spells (yay building!). For shooing I took 6 off of the now T1 skink unit on the left and 2 from the skinks on the right flank.
 On Chris’ turn 1 the left flank skinks moved to face the shades, while the rest of his army advanced towards the right flank. Chris chose to get his 4 shots with 2 of his units and with the last form up to protect the warriors (who claimed the barrier). For his 5/4 magic phase Chris put -3T on the BSB which I allowed. I then dispelled his other spell. His 8 shots didn’t do anything
 On my turn 2 I put some charges into play. The shades charged the 4 skinks on the left, which fled in front of the temple guard. The center unit of skinks fled from my dark riders. My BSB made it in with the 10 man formed up skinks, taking a wound in the process (T1 not mattering due to just able to hit on poison) and on the right the unit of dark riders hit the right most long unit of skinks, losing 1 to stand and shoot. In the rest of my movement, the hydras started to swing back left. For my magic phase of 3/2 I went straight for purple sun, knowing that at level 1 I wasn’t getting anything off with just 1 extra die. I didn’t even roll high enough to cast. In combat I killed both units of skinks and over ran outside the warrior’s line of site.

 On Chris’ turn 2 his character tried to charge out of the unit and catch the unit of dark riders that had failed his charge. I fled, leaving the character out in the open. His unit hoards out to block the hydras from the temple guard. Both units of skinks rally, preventing the temple guard from moving forward. The temple guard therefore turn to face the BSB and dark rider unit making its way behind his lines. For his 5/3 magic phase I allow Pendulum to go off, making my initiative tests (BSB fails, but charmed shield – skinks had failed to hit him). I dispel his other spell.

 On my turn 3, the left unit of dark riders charges the remaining skinks in the left flank unit, which hold. Because the Temple guard had changed facing, he had created a pocket of safety for my dark riders. My BSB also charges the rear of the newly rallied center skink unit. My shades and dark riders move into surround and begin the long fight of whittling down the T4 blocks. My hydras continue to swing left, one making it past the building. In my 6/4 magic phase I cast Doom and Darkness on the Slann’s unit which prevents the rear skinks from using his leadership and allows me to run that unit down in combat. The 3 man unit of skinks also dies to attacks, allowing me to reform.


 On Chris’ turn 3 his rider swings wide right and the hoard moves up to block the hydras. The temple guard also move to the other side of the building. Chris wants me push the hydras around the building and into the waiting arms of the flaming temple guard. In his 9/5 magic phase he irresistibles pendulum, hitting 3 dark riders and my general. 2 Dark riders fail and die but my slann passes his test. Slann takes a wound and the rest of his dice are removed. Because I have a handful of dispel dice still, I dispel the withering, restoring my BSB to full toughness.
 On my turn 4 and I continue to swing the left most hydra around the building, but back towards the board edge so the temple guard cannot charge him. With the right hydra I walk up to the warriors and breath on them but only kill 3. I swing with my dark riders to shoot the solo hero and manage to put a wound on him. In my magic phase I irresistible caress (I had to abandon the building due to his encroachment) and manage to kill the slann, but it also costs my wizard her life. Her explosion kills 4 warriors.
 On Chris’ turn 4 he charges with his hero at my hydra, but I flee, going through the building. He then recharges with his temple guard, forcing me to flee back towards my other hydra. He fails with both to catch the hydra.
On my turn 5 the hydra rallies and I do enough shooting on the temple guard to cause a panic test, which they fail. Chris concedes giving me a 5 point victory. I don’t think if we had played it out I would have earned a 5 point victory though, as there were still over 10 temple guard and 20 warriors. Even if I killed the hero, I effectively was still losing points on the general exchange. Oh well. In the end I get granted an 11/2 victory. Chris gets 2 for my general dying and I get 11; 5 for max win, 2 points for general, 2 points for banners and 2 points for quarters, assuming I could kill one of his units and his bsb, and claim quarters accordingly. My points didn’t really matter, and it was clear that Chris had earned 2.
There were three buildings on the table, one each in opposite corners of one level and a big three level on more center. There was also a thick wood hedge (hard cover, -2), an impassible grave and a small forest. The top left building granted a 6+ regen to any ‘good army’. The big building provided any wizard within 3” access to his entire spell lore. The grave caused a +1 to point on any model within 6” and the building in the bottom right gave an ‘evil army’ -1 leadership within 6”. Go check out the round 1 post for the pictures of the terrain and my initial round 1 thoughts. Going into this game I had no concerns about the terrain. I also got the “left” side in the pictures from round 1, though for this report I will be orienting based on my board edge.
I wasn’t surprised when I saw that I was being against my friend and club mate Chris for the last round. He is a solid player, and while I thought the abomination in his second round might have given him trouble, I knew he had the skill to deal with it (especially against a less experienced player). Chris’ list was:
Slann, Lore of Shadow, Plaque of Tepok, Blood Statuette of Spite, BSB, Standard of Discipline, Focused Rumination
Scar Vet, Cold One, Burning Blade of Chotec, Dragonbane Gem
20 Temple Guard, Full command, banner of eternal flame
30 warriors, full command
10 Skink Skirmishers
10 Skink Skirmishers
10 Skink Skirmishers
10 Skink Skirmishers
Chris and I had been talking about Blood Statuette of Spite, which is a one use bound 5 spell that is cast on a character. It forced a toughness test that if failed causes a wound with no armor save. It then requires additional saves until one is made or the character is killed. Chris had been trying to think of something to do that wasn’t death but still allowed for a critical character snipe. We decided that if he wanted to try it, then the proper lore would be Shadow as it allowed for the lowering of toughness through Withering. It also provided him the benefit already inherent within Shadow magic, which I understand he used quite effectively in his other two games.
Against me Chris took Penumbral Pendulum, Mind Razor, Miasma, Withering, Steed of Shadows. It seems he had dropped Pit of Shades for Miasma, thinking that high initiative shades wouldn’t be at risk. I pointed out that Hydras only had an initiative of 2. I thinking dropping Steed would have been a better play.
The Mission: Battlineline
Primary Objective: Destroy the enemy’s army.
This mission had a convoluted way of figuring out the victory. First, no points were given for killing the general or capturing banners, just for the cost of the unit/model. It requires dividing the losers points by the winners points. I guess this is a way of scaling the 100 points required to win by the size of the game, but it just seems like extra work.
90 to 100 percent – Draw and both players get 1 point
75 to under 90 percent – Winner earns 2 points
50 to under 75 percent – Winner earns 3 points
Below 50 percent – winner earns 5 points.
Secondary objectives:
2 Points for slaying general
1 point per standard
1 point for table quarters that can be held or contested by 1 model.
Maximum points that can be earned are 15.
Looking at Chris’ list I see that I could earn a maximum of 15 (5 points for max win, 2 points for general, 4 points for banners, 4 points for quarters) but could give up 16 (5 points for max win, 2 points for general, 5 points for banners, 4 points for quarters). This makes the closest spread and also the only one where I could possibly get a maximum of 15 points.
Looking at Chris’ list I commented on the large amount of fire, both the Temple Guard and the Hero (who went with the warriors). He responded by saying he knew I was taking two hydras. This answered easily how he was able to deal with Abomination as well. I wasn’t worried though, while it did mean I would have to be more conservative with the hydras, I was confident I could whittle the units down enough that even if they could put a few wounds on the hydra, I would be able to win the combats. But first I knew I had to deal with the 40 skinks.
We rolled, and I got first turn. I immediately swung the hydras and bsb hard right in the hopes of luring his blocks that way so my general could stay near the building and get access to my missing spells. Chris joked that I needed to suck my wizard into the warp on the first spell, so for my 6/5 magic phase I obliged him by rolling a miscast on my first spell, soul blight on the left flank skinks. Instead of sucking my caster into the warp though, I instead dropped him to level 1 and leaving him with only power of darkness and caress for spells (yay building!). For shooing I took 6 off of the now T1 skink unit on the left and 2 from the skinks on the right flank.
On my turn 5 the hydra rallies and I do enough shooting on the temple guard to cause a panic test, which they fail. Chris concedes giving me a 5 point victory. I don’t think if we had played it out I would have earned a 5 point victory though, as there were still over 10 temple guard and 20 warriors. Even if I killed the hero, I effectively was still losing points on the general exchange. Oh well. In the end I get granted an 11/2 victory. Chris gets 2 for my general dying and I get 11; 5 for max win, 2 points for general, 2 points for banners and 2 points for quarters, assuming I could kill one of his units and his bsb, and claim quarters accordingly. My points didn’t really matter, and it was clear that Chris had earned 2.
Olde World Gaming – Round 2 – Phillip Jackson – Lizardman
The Mission: Blood & Glory
Primary Objective: Massacre your opponent. 2 points for killing general, 1 point for each captured (combat) banner, 3 points for breaking our opponent. No auto ending of game for breaking, so points can be earned by either player.
Secondary Objective: 1 point for each monster, warmachine, lord (not general) and hero killed.
Max of 15 points can be earned.
For this mission I could give up 12 points (2 for general, 4 banners, 3 for breaking, 2 monsters and 1 hero). My goal seemed simple, kill things. I also think it’s important to note that nothing in this mission is contentious, so it’s possible for both players to walk away as the “winner.” I sarcastically mentioned this to my opponent, who responded with a harsh “that’s not in the spirit of the game.”
My opponents list was:
Slann, Focused Rumination, Focus of Mystery, Becalming Cogitation, Lore of Life (so all spells, no 6s and an extra die). This slann is good at any level.
Scar Vet, BSB, Cold One, Armor of Fortune, Venom of the Firefly Frog,
23 Saurus Warriors, Full Command
10 Skink Skirmishers
5 Cold One Cavalry
7 Chameleon Skinks
Ancient Stegadon
Based on the objectives for the mission Phillip had 10 points for me to earn (2 for general, 3 for banners, 3 for breaking, 1 for monster and 1 for the hero). Once again I was playing a mission where I couldn’t earn as may points as my opponent. Normally I would be worried about the Slann set up he has. Dwellers just wrecks my skaven, but I’m slowly realizing that my Dark Elves are a completely different animal (I just don’t have enough games with the list to be comfortable with what isn’t a bad pairing). Thinking about it now, I’m not sure why I would be worried about Dwellers. It’s got a high casting to throw at one of my S4 characters or 6 man S3 units, and not worth it at the Hydra. I was worried about the Steg as all of those poison shots would wreck a unit a turn. Also the poison (on character) and armor on the cavalry had me worried (I miss you metal wizard!).
Walking up to the table, I figured this table’s terrain would play much less of a role (sad no ‘all spells building). On Phillip’s side of the board there was two very large hills which played no role, he also had a fence that did nothing. I had a fence I may have defended once, but didn’t actually get shot at that point. I also had a hill on my left board edge that I charged down once late game (but didn’t need the combat resolution). In the center from left to right there was a forest (who earned MVP for the game), a ruins that cast a random spell and an impassible well which did something on a dice role but was never used. The big features were the forest and the casting hub.
From left to right (my perspective) Phillip deployed his cavalry with BSB, saurus with Slann in front, stegadon and his skinks. He would go on to put the chameleons basically in his deployment zone. I deployed a dark rider unit on the left, both hydras with characters for support in the left center with the last two dark riders on the right, blocking out the scouts in my deployment zone. I would place my scouts in his back right and vanguard just enough to be in shooting range (damn that skirmish!).
We rolled off and Phillip go the first turn. He advanced across the board, except for the skinks, which about faced to play with the Shades. On his magic phase (5/4), he would just put up throne. The terrain feature gave the Stegadon 10WS and 10I. His shooting would kill 2 shades.


 My turn 1 and I found the saurus warriors in charge range of both hydras. Phillip didn’t seem happy that he had done that. I charge with the first, he passes his terror test and holds. At this point I debate, be happy with 1 getting in combat? Hope for the flee and push the Slann back and out for a few turns? Hope he holds on the second? I decide since it’s just turn 1 to declare the charge, and charge again with the left hydra. Phillip chooses to flee and roll an abysmally low number. If either hydra rolls a 10 to charge I will catch the saurus, the slann and probably the game. Alas, no 10s, and both Hydras trundle into the forest edge. The shades charge into the skinks. A unit of dark riders charge the chameleons, losing 3 to the stand and shoot (ouch!). My 5/3 magic phase sees me getting a Spirit Leech off on the Stegadon. Leadership 9 versus Leadership 6, a great roll and some wonderful randomization sees the Stegadon deleted and enough extra dice earned back to dispel throne. The terrain feature had cast Plague of Rust on the Stegadon before it died. In shooting I kill one of the riders. Shades kill 3 skinks in combat and then die to a man when the skinks fight back (really?!?). The Dark Riders kill 2 chameleons which then make their snake eyes leadership roll.


 Phillip’s turn 2 and the cavalry charge the left most hydra, 1 rider dies to the forest. The slann rallies and the skinks come about to re-join the fray. For the magic phase the terrain casts Wild Form on my dark riders in combat with the chameleons. A 2/1 magic phase allows the slann to cast shield of thorns on the chameleons which then kills a dark rider. In the combat 2 chameleons die as does a rider. The chameleons again roll snakes to hold. In the other combat the hydra whiffs, runs but doesn’t get caught. Amazingly the forest kills another rider.

My Turn 2 and the Hydra rallies. I charge the second dark rider unit into the failing chameleons. My caster moves to sun the cavalry. I roll a 7/6 magic phase, and not wanting to risk losing my dice on a miscast roll to dispel shield of thorns first… and fail, ending my magic phase. The terrain soulblights the chameleons. In shooting I kill some of the warriors and the chameleons die in combat. I make the mistake of over running with my larger unit, when I should have turned to face the skinks. I was thinking of getting some extra movement towards center board to add shooting to the warriors. It was dumb, and nearly cost me a banner later in the game.


 Phillip’s turn 3 and he recharges the hydra with his rider. The lovely forest goes and kills another rider, meaning that there is 1 rider left (1 dead from shooting and THREE from the forest). The saurus warriors move up some and the skinks move to shoot the larger dark rider unit. In magic speed of light gets cast on my solo rider. Phillip rolls a 7/5 dispel phase, but I manage to fail my dispel second dispel attempt (after getting throne) so he gets of +2T on warriors and a small earthblood on the warriors. The hydra/rider combat doesn’t do anything.

 On my turn 3 I counter charge with the left most unit of dark riders into the cavalry/hydra combat (remember that hill, well, here it is). I also charge the other hydra and the BSB into the saurus warriors. For the magic phase the building kills a single dark rider with a weak fireball and I get an 8/4 phase. I get off soulblight into combat with 3 dice. I had moved my caster alongside the saurus combat, and Phillip was afraid I would sun down the line, picking up the rest of the unit. It’s exactly what I was planning on doing, and even with an extra die, he manages to dispel it. I shoot at the skink unit, which passes its panic test. The hydra and dark riders kill off the cavalry and the hero, though I lose three dark riders. I put 2 wounds on the Slann and kill some warriors, but he holds on steadfast. I had popped the egg on the BSB, so his Slann had challenged to soak up the wounds.

 Lizardman Turn 4 and things aren’t looking that hot for Phillip. The building soulblights the single dark rider. In his 6/4 magic phase he rolls a 15 (so 19 with wizard level) on throne so I let it go through. I then dispel the +4T and he gets through Regen and Shield. I’m no longer worried about the effects of the combat. His warriors can’t hurt the hydra and his slann can’t hurt my BSB, so I know that with my general there the worst I’m going to see is two chances at leadership 7 or 8. I’m winning but a little now, but all I need is time and there is still plenty. I win the combat after killing a few warriors and he is steadfast.
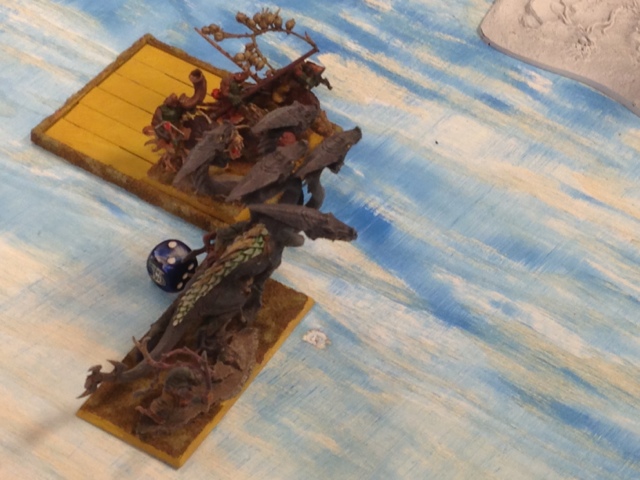
 Dark Elf turn 4 and Phillip is again left with the option in my 4/4 magic phase to try to stop my3 dice soulblight and risk my 1 remaining die turn into a purple sun with power of darkness. This time he opts for the soulblight, and I proceed to power of darkness into a purple sun. His Slann passes but drops his warriors to only 1 model. I choose not to dispel any of his remains in plays. I kill the last warrior and the Slann passes his test.

 Lizardman Turn 5 and a 6/3 magic phase (oh, by the way, the last three skinks for some reason ran off to conserve points in a mission without points) sees the Slann once again healing all of his wounds, awakening the woods on the second advancing hydra and going +4T. I then use my dice to dispel shield (and fail). Combat does nothing and the Slann holds (yay BSB for the win).
 Dark Elf Turn 5 and I start to press in. My general charges into the flank of the Slann and the right most dark riders charge the front. I use all my power dice to dispel shield of thorns. Combat does nothing, but the added charge, banner and flank to my BSB gets the slann to break from combat, and with four chances the Slann is easily run down.
We play the last two turns for some reason, I think just to see what the magic building does – and it does something, blowing up a hydra with a fireball granting my opponent another point. I scored a 10 (2 for General, 3 banners, 1 monster, 1 hero, 3 Breaking opponent) but I’m pretty sure we missed counting the hero and only reported a 9. He scored a 1 just for the fireball killing the hydra.
Well that’s round 2. Last round and top table coming up.
Primary Objective: Massacre your opponent. 2 points for killing general, 1 point for each captured (combat) banner, 3 points for breaking our opponent. No auto ending of game for breaking, so points can be earned by either player.
Secondary Objective: 1 point for each monster, warmachine, lord (not general) and hero killed.
Max of 15 points can be earned.
For this mission I could give up 12 points (2 for general, 4 banners, 3 for breaking, 2 monsters and 1 hero). My goal seemed simple, kill things. I also think it’s important to note that nothing in this mission is contentious, so it’s possible for both players to walk away as the “winner.” I sarcastically mentioned this to my opponent, who responded with a harsh “that’s not in the spirit of the game.”
My opponents list was:
Slann, Focused Rumination, Focus of Mystery, Becalming Cogitation, Lore of Life (so all spells, no 6s and an extra die). This slann is good at any level.
Scar Vet, BSB, Cold One, Armor of Fortune, Venom of the Firefly Frog,
23 Saurus Warriors, Full Command
10 Skink Skirmishers
5 Cold One Cavalry
7 Chameleon Skinks
Ancient Stegadon
Based on the objectives for the mission Phillip had 10 points for me to earn (2 for general, 3 for banners, 3 for breaking, 1 for monster and 1 for the hero). Once again I was playing a mission where I couldn’t earn as may points as my opponent. Normally I would be worried about the Slann set up he has. Dwellers just wrecks my skaven, but I’m slowly realizing that my Dark Elves are a completely different animal (I just don’t have enough games with the list to be comfortable with what isn’t a bad pairing). Thinking about it now, I’m not sure why I would be worried about Dwellers. It’s got a high casting to throw at one of my S4 characters or 6 man S3 units, and not worth it at the Hydra. I was worried about the Steg as all of those poison shots would wreck a unit a turn. Also the poison (on character) and armor on the cavalry had me worried (I miss you metal wizard!).
Walking up to the table, I figured this table’s terrain would play much less of a role (sad no ‘all spells building). On Phillip’s side of the board there was two very large hills which played no role, he also had a fence that did nothing. I had a fence I may have defended once, but didn’t actually get shot at that point. I also had a hill on my left board edge that I charged down once late game (but didn’t need the combat resolution). In the center from left to right there was a forest (who earned MVP for the game), a ruins that cast a random spell and an impassible well which did something on a dice role but was never used. The big features were the forest and the casting hub.
From left to right (my perspective) Phillip deployed his cavalry with BSB, saurus with Slann in front, stegadon and his skinks. He would go on to put the chameleons basically in his deployment zone. I deployed a dark rider unit on the left, both hydras with characters for support in the left center with the last two dark riders on the right, blocking out the scouts in my deployment zone. I would place my scouts in his back right and vanguard just enough to be in shooting range (damn that skirmish!).
We rolled off and Phillip go the first turn. He advanced across the board, except for the skinks, which about faced to play with the Shades. On his magic phase (5/4), he would just put up throne. The terrain feature gave the Stegadon 10WS and 10I. His shooting would kill 2 shades.
My Turn 2 and the Hydra rallies. I charge the second dark rider unit into the failing chameleons. My caster moves to sun the cavalry. I roll a 7/6 magic phase, and not wanting to risk losing my dice on a miscast roll to dispel shield of thorns first… and fail, ending my magic phase. The terrain soulblights the chameleons. In shooting I kill some of the warriors and the chameleons die in combat. I make the mistake of over running with my larger unit, when I should have turned to face the skinks. I was thinking of getting some extra movement towards center board to add shooting to the warriors. It was dumb, and nearly cost me a banner later in the game.
We play the last two turns for some reason, I think just to see what the magic building does – and it does something, blowing up a hydra with a fireball granting my opponent another point. I scored a 10 (2 for General, 3 banners, 1 monster, 1 hero, 3 Breaking opponent) but I’m pretty sure we missed counting the hero and only reported a 9. He scored a 1 just for the fireball killing the hydra.
Well that’s round 2. Last round and top table coming up.
Monday, March 25, 2013
Olde World Gaming – Round 1 – Joel Lucas – Wood Elves
The Mission :
Deployment – Battle for the Pass
Primary Objective – Objectives – three objectives, placed by TO. One is in each deployment zone and one in the center. Objectives could be held by any unit with five or more rank and file units (6 inches) or a character. Any unit could contest and prevent scoring. The objective in your own deployment zone was worth 1 point, the center was worth 2 and the last worth 3.
Secondary Objectives – Slay General 2 points; Capture (in combat) Standards (and BSB) 1 point each; Table Quarters (can be held by any model) 1 point each.
All Missions allowed for a maximum of 15 points to be earned.
The first thing I saw about this mission is that it required 5 rank and file models. I am running 4 units of 6 models. That means that if my opponent places 8 wounds well I’m left with just my characters able to score. I also see that I can give up a maximum of 16 points (6 if they get objectives, 2 for my general, 4 banners and 4 table quarters) so it’s possible for me to do well, but still only split the baby. What I would need to do was push hard and fast to keep my opponent facing his board edge instead of moving down the field to claim objectives. I would also need to quickly shut down any shooting, flyers or scouts. Smart play would also be needed to maintain at least 3 of my 6 possible scoring units (including characters).
Pairings went up and I seem I’m playing Wood Elves. His list was:
 Spellweaver, Level 4, Lore of Life
Noble, Ogre Blade, Dragonhelm
8 Dryads
8 Dryads
10 Glade Guard, Music, Standard
7 Glade Guard, Standard, Scouts
3 Treekin
5 Wardancers
5 Wardancers
Treeman
So looking back at my plan and I see my priorities. His list allows for 9 scoring units (monstrous infantry counted at 3, not 5). He has only 2 banners, so a maximum of 14 points for me to earn (6 objectives, General, 2 banners, 4 quarters), but because of his larger amount of scoring units I will have to work much harder to open up my points. Based on my priorities, I knew that the two units of glade guard and the treeman would have to be top priority. While the characters also had bows, I needed to remove the major shooting first. For his spells Joel rolled Awakening of the Wood, Flesh to Stone, Throne of Vines and Regrowth.
Spells I rolled were Spirit Leech, Caress of Laniph, Soulblight and Doom and Darkness
 The Table: I don’t usually make a section about terrain, but with
the mysterious terrain everywhere I will be for at least this game. My
third game was also on this table, so remember as you read. There
were three buildings on the table, one each in opposite corners of one
level and a big three level on more center. There was also a thick wood
hedge (hard cover, -2), an impassible grave and a small forest.
The Table: I don’t usually make a section about terrain, but with
the mysterious terrain everywhere I will be for at least this game. My
third game was also on this table, so remember as you read. There
were three buildings on the table, one each in opposite corners of one
level and a big three level on more center. There was also a thick wood
hedge (hard cover, -2), an impassible grave and a small forest.


 You
can’t tell in the above picture, but behind the tall tower is another
building that granted a 6+ regen to any ‘good army’. The big building
provided any wizard within 3” access to his entire spell lore. The
grave caused a +1 to point on any model within 6” and the building in
the bottom right gave an ‘evil army’ -1 leadership within 6”.
You
can’t tell in the above picture, but behind the tall tower is another
building that granted a 6+ regen to any ‘good army’. The big building
provided any wizard within 3” access to his entire spell lore. The
grave caused a +1 to point on any model within 6” and the building in
the bottom right gave an ‘evil army’ -1 leadership within 6”.
At first glance I thought this table put me at a disadvantage, but after some thought I realized that the pro-good and anti-evil features were in the corners and so easily avoidable, but the extra spells and +1 to point were much more towards center and more to my liking. After some thought, and two games, I was very happy with this table.


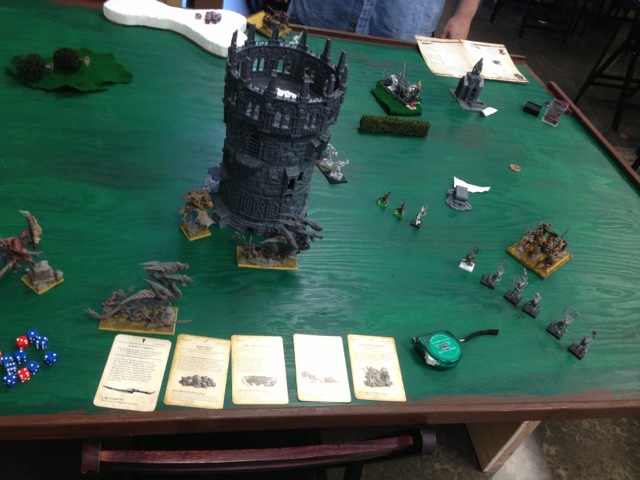
I missed pictures for deployment and the first few turns, but I kept to my pre-stated plan. I chose the top side in the above picture, placing him deploying next to the +1 to point for buffs to my shooting and giving me early access to the all spell building. Using the table picture for orientation, I deployed top, with one unit of dark riders on the right, one of the left and one towards center. The hydras and the characters went on the left-center to play ring around the building.
Joel deployed a dryad on the left, then his wardancers (with the hero going in one), then his treekin and treeman. His glade guard with his lord went into his first just off center with the last unit of dryads closing off the right side. He was able to use his skirmish and the narrower board to mostly block off the table.
We rolled and he got first scout deployment, placing his scouts in the top right corner. I countered with my shades in my back field. For vanguard, my two units center and left moved up to just be within long range (and avoid the -1 to move on my turn) and the right unit turned around to face the scouts. We rolled off and I got first turn.
I advanced my characters and hydra to take over the building. All the shooters stayed still. I rolled a 9/6 magic phase and proceeded to only get an 8 on my first casting of soulblight, ending my phase. For shooting I knocked down the skirmishers to only a few models and began to put pressure on the left most dryad unit in order to open up his back field.
On Joel’s turn 1 one he advances and spreads out, but leaves gaps between his units for me to exploit. His magic 7/6 magic phase is also a bust when he fails his first spell. He shoots up my right most dark rider unit, knocking them below scoring.

My turn 2 and the shades charge the few remaining skirmishers, which then flee and run off the table to deny me the banner. On the right I exploit the gap between the dryads and wardancers and move a unit of dark riders behind his lines. On the right I move the center unit between his units in the hopes of getting a later turn charge on the glade guard. The remaining right flank dryad unit moves to the edge to try to secondary that charge. I roll a 3/2 magic phase, get of spirit leech but fail to cause any wounds to the treeman.

Joel’s turn 2 and he reacts to my hard rightmost push. His dryad unit falls back to defend the glade guard and the treeman swings back. The treekin and wardancers close the door with the building to meet the hydras should they continue their swing around the building. The weakened dryad unit pulls back, but can’t get away from the +1 wound grave marker. Joel rolls a 9/6 magic phase, putting +2T on the gravestone dryads. His treeman puts 5 wounds on the center unit of dark riders, who roll an amazing 4 6’s. Because of this Joel is forced to put his bow shooting into this unit, knocking 2 more off.

 On my turn 3, the center dark
riders charge the glade guard, surviving the stand and shoot, but losing
a member to the forest. This causes a panic, making the unit fall
back. A hydra charges into a unit of wardancers with the hero. My
wizard and a hydra move up to see his closing door, outside the
wardancers range and at an angle where the treekin cannot get around the
building to charge them. My left darkriders pull back to continue to
pepper the dryads (the +1 wound stone effectively negating the +T). My
right flank dark riders pull back away from the treeman. My shades move
to claim my objective. I roll a 7/4 magic phase and fail the first
spell (go magic!). In shooting I kill a little, and in combat my hydra
pushes through the wardancers and hero, over running towards the glade
guard.
On my turn 3, the center dark
riders charge the glade guard, surviving the stand and shoot, but losing
a member to the forest. This causes a panic, making the unit fall
back. A hydra charges into a unit of wardancers with the hero. My
wizard and a hydra move up to see his closing door, outside the
wardancers range and at an angle where the treekin cannot get around the
building to charge them. My left darkriders pull back to continue to
pepper the dryads (the +1 wound stone effectively negating the +T). My
right flank dark riders pull back away from the treeman. My shades move
to claim my objective. I roll a 7/4 magic phase and fail the first
spell (go magic!). In shooting I kill a little, and in combat my hydra
pushes through the wardancers and hero, over running towards the glade
guard.

On Joel’s turn 3 the treeman charges and runs down the fleeing unit of dark riders. He moves his left unit of dryads to block the hydra from the glade guard. The treekin turn to face the hydra, as does the treeman after the over run (with his leadership test). I’m assuming he thinks the dryads won’t break and he will get a counter charge. With a 2/1 magic phase Joel +2T the dryads, reinforcing my assumption.

On my turn 4 I charge the dryads. The dark riders begin to envelope the glade guard. My other hydra and wizard come around a little to see the treekin and treeman. My BSB charges the last unit of wardancers. I roll a 7/4 magic phase and things finally start to happen. Please note, that so far this game my magic has done nothing. My first cast is soulblight on the dryads, which is dispelled. I then put Doom and Darkness on them. I use the last of my dice to soul leech the treekin, killing one model. I use the dice I get back thanks to death to roll one die on Power of Darkness, getting 4 dice. I use those 4 dice to cast a small purple sun (thanks building), hitting one treekin and the treeman and killing both. Getting three dice back from that, I use Fate of Bjuna to kill off the last treekin. So 7 dice turns into 16 and kills 3 treekin and a treeman. In shooting I drop the archers down some. In combat I kill the dryads and overrun into the glade guard. Also, my BSB takes out the last unit of wardancers in combat.
Joel’s turn 4 and his right most dryad unit makes a break for my objective (at least I think that’s where he was going). He puts +2T on his glade guard with a 9/5 magic phase and follows that up with a regrow of 3 models (I had used all my dispel dice on a really good throne roll). My hydra decides its tired and doesn’t kill the unit off. He rolls snakes to stay.
My turn 5 and I move to shoot up the dryads, though being careful to not pull units to far away from the objectives. With a 9/5 magic phase I get soulblight off on the dryads and whittle them down with shooting (to 5 models, which leaves them as scoring). My hydra finishes off the archers but doesn’t kill his general, who stays.
Joel’s turn 5 and with a 4/4 magic phase gets +2T off on his caster. The dryads continue to run. The caster dies.
 My
turn 6 and my BSB charges the flank of the dryads. I move to claim all
the objectives. I roll a strong 10/5 magic phase. Joel dispels Doom
and Darkness but I cast Aspect of the Dreadknight on my BSB and
soulblight onto the dryads. This is the first time I’ve ever cast
Aspect, which is a shitty spell, but I didn’t want to risk failing that
fear test. I kill 2 dryads, making them no longer scoring, but because
he has moved into the building he is stubborn and holds.
My
turn 6 and my BSB charges the flank of the dryads. I move to claim all
the objectives. I roll a strong 10/5 magic phase. Joel dispels Doom
and Darkness but I cast Aspect of the Dreadknight on my BSB and
soulblight onto the dryads. This is the first time I’ve ever cast
Aspect, which is a shitty spell, but I didn’t want to risk failing that
fear test. I kill 2 dryads, making them no longer scoring, but because
he has moved into the building he is stubborn and holds.
Joel’s turn 6 and I kill 2 more dryads, leaving the last one stubborn in the forest, but he fails his leadership test and gets run down. Because of this I get to claim the fourth quarter, missing only the one banner that ran off the table and only giving up the banner the treeman ran down. 13/1 victory.
Deployment – Battle for the Pass
Primary Objective – Objectives – three objectives, placed by TO. One is in each deployment zone and one in the center. Objectives could be held by any unit with five or more rank and file units (6 inches) or a character. Any unit could contest and prevent scoring. The objective in your own deployment zone was worth 1 point, the center was worth 2 and the last worth 3.
Secondary Objectives – Slay General 2 points; Capture (in combat) Standards (and BSB) 1 point each; Table Quarters (can be held by any model) 1 point each.
All Missions allowed for a maximum of 15 points to be earned.
The first thing I saw about this mission is that it required 5 rank and file models. I am running 4 units of 6 models. That means that if my opponent places 8 wounds well I’m left with just my characters able to score. I also see that I can give up a maximum of 16 points (6 if they get objectives, 2 for my general, 4 banners and 4 table quarters) so it’s possible for me to do well, but still only split the baby. What I would need to do was push hard and fast to keep my opponent facing his board edge instead of moving down the field to claim objectives. I would also need to quickly shut down any shooting, flyers or scouts. Smart play would also be needed to maintain at least 3 of my 6 possible scoring units (including characters).
Pairings went up and I seem I’m playing Wood Elves. His list was:
Noble, Ogre Blade, Dragonhelm
8 Dryads
8 Dryads
10 Glade Guard, Music, Standard
7 Glade Guard, Standard, Scouts
3 Treekin
5 Wardancers
5 Wardancers
Treeman
So looking back at my plan and I see my priorities. His list allows for 9 scoring units (monstrous infantry counted at 3, not 5). He has only 2 banners, so a maximum of 14 points for me to earn (6 objectives, General, 2 banners, 4 quarters), but because of his larger amount of scoring units I will have to work much harder to open up my points. Based on my priorities, I knew that the two units of glade guard and the treeman would have to be top priority. While the characters also had bows, I needed to remove the major shooting first. For his spells Joel rolled Awakening of the Wood, Flesh to Stone, Throne of Vines and Regrowth.
Spells I rolled were Spirit Leech, Caress of Laniph, Soulblight and Doom and Darkness


At first glance I thought this table put me at a disadvantage, but after some thought I realized that the pro-good and anti-evil features were in the corners and so easily avoidable, but the extra spells and +1 to point were much more towards center and more to my liking. After some thought, and two games, I was very happy with this table.
I missed pictures for deployment and the first few turns, but I kept to my pre-stated plan. I chose the top side in the above picture, placing him deploying next to the +1 to point for buffs to my shooting and giving me early access to the all spell building. Using the table picture for orientation, I deployed top, with one unit of dark riders on the right, one of the left and one towards center. The hydras and the characters went on the left-center to play ring around the building.
Joel deployed a dryad on the left, then his wardancers (with the hero going in one), then his treekin and treeman. His glade guard with his lord went into his first just off center with the last unit of dryads closing off the right side. He was able to use his skirmish and the narrower board to mostly block off the table.
We rolled and he got first scout deployment, placing his scouts in the top right corner. I countered with my shades in my back field. For vanguard, my two units center and left moved up to just be within long range (and avoid the -1 to move on my turn) and the right unit turned around to face the scouts. We rolled off and I got first turn.
I advanced my characters and hydra to take over the building. All the shooters stayed still. I rolled a 9/6 magic phase and proceeded to only get an 8 on my first casting of soulblight, ending my phase. For shooting I knocked down the skirmishers to only a few models and began to put pressure on the left most dryad unit in order to open up his back field.
On Joel’s turn 1 one he advances and spreads out, but leaves gaps between his units for me to exploit. His magic 7/6 magic phase is also a bust when he fails his first spell. He shoots up my right most dark rider unit, knocking them below scoring.
My turn 2 and the shades charge the few remaining skirmishers, which then flee and run off the table to deny me the banner. On the right I exploit the gap between the dryads and wardancers and move a unit of dark riders behind his lines. On the right I move the center unit between his units in the hopes of getting a later turn charge on the glade guard. The remaining right flank dryad unit moves to the edge to try to secondary that charge. I roll a 3/2 magic phase, get of spirit leech but fail to cause any wounds to the treeman.
Joel’s turn 2 and he reacts to my hard rightmost push. His dryad unit falls back to defend the glade guard and the treeman swings back. The treekin and wardancers close the door with the building to meet the hydras should they continue their swing around the building. The weakened dryad unit pulls back, but can’t get away from the +1 wound grave marker. Joel rolls a 9/6 magic phase, putting +2T on the gravestone dryads. His treeman puts 5 wounds on the center unit of dark riders, who roll an amazing 4 6’s. Because of this Joel is forced to put his bow shooting into this unit, knocking 2 more off.
On Joel’s turn 3 the treeman charges and runs down the fleeing unit of dark riders. He moves his left unit of dryads to block the hydra from the glade guard. The treekin turn to face the hydra, as does the treeman after the over run (with his leadership test). I’m assuming he thinks the dryads won’t break and he will get a counter charge. With a 2/1 magic phase Joel +2T the dryads, reinforcing my assumption.
On my turn 4 I charge the dryads. The dark riders begin to envelope the glade guard. My other hydra and wizard come around a little to see the treekin and treeman. My BSB charges the last unit of wardancers. I roll a 7/4 magic phase and things finally start to happen. Please note, that so far this game my magic has done nothing. My first cast is soulblight on the dryads, which is dispelled. I then put Doom and Darkness on them. I use the last of my dice to soul leech the treekin, killing one model. I use the dice I get back thanks to death to roll one die on Power of Darkness, getting 4 dice. I use those 4 dice to cast a small purple sun (thanks building), hitting one treekin and the treeman and killing both. Getting three dice back from that, I use Fate of Bjuna to kill off the last treekin. So 7 dice turns into 16 and kills 3 treekin and a treeman. In shooting I drop the archers down some. In combat I kill the dryads and overrun into the glade guard. Also, my BSB takes out the last unit of wardancers in combat.
Joel’s turn 4 and his right most dryad unit makes a break for my objective (at least I think that’s where he was going). He puts +2T on his glade guard with a 9/5 magic phase and follows that up with a regrow of 3 models (I had used all my dispel dice on a really good throne roll). My hydra decides its tired and doesn’t kill the unit off. He rolls snakes to stay.
My turn 5 and I move to shoot up the dryads, though being careful to not pull units to far away from the objectives. With a 9/5 magic phase I get soulblight off on the dryads and whittle them down with shooting (to 5 models, which leaves them as scoring). My hydra finishes off the archers but doesn’t kill his general, who stays.
Joel’s turn 5 and with a 4/4 magic phase gets +2T off on his caster. The dryads continue to run. The caster dies.
Joel’s turn 6 and I kill 2 more dryads, leaving the last one stubborn in the forest, but he fails his leadership test and gets run down. Because of this I get to claim the fourth quarter, missing only the one banner that ran off the table and only giving up the banner the treeman ran down. 13/1 victory.
Subscribe to:
Posts (Atom)